on
Object-Detection fine-tuning with handbag dataset
Mondeique는 여성 가방을 자동으로 인식하고 카테고리를 자동으로 추출하는 가방 검색 서비스 라는 아이디어로 2019 하반기 예비창업패키지를 수행했습니다. 그 아이디어의 기반에는 object-detection 과 image category classification 두 가지 기술이 있었습니다,
본 포스트는 그 중 하나인 object detection 에 대한 개발 경험을 공유하고자 합니다. 일단 접근은 굉장히 쉬웠습니다. 아무래도 이 분야 자체가 API로 나올 정도로 발전이 많이 되어있고 일반적인 분야이기 때문이 아닐까요? 저는 MSCOCO dataset을 기반으로 학습된 여러 모델들을 활용한 object detection API 를 사용했으며 handbag를 detection 하는 task 였기 때문에 fine-tuning 을 통해 그 성능을 높이고자 했습니다. 아래는 그 순서입니다.
- protocol buffer test
- pycocotools installation
- training with customized dataset
- Data Structure
- Test Result
protocol buffer test
tensorflow 에서 기본적으로 제공하는 object detection API 를 사용하기 위해서는 protocol buffer 를 이용해야 했습니다.
$ conda activate mondeique
(mondeique) $ sudo apt-get install protobuf-compiler python-pil python-lxml python-tk
(mondeique) $ sudo pip install pillow
(mondeique) $ sudo pip install jupyter
(mondeique) $ sudo pip install matplotlib
편의를 위해 conda virtualenv는 생략했습니다. (mondeique)
Object Detection API는 protocol buffer를 이용합니다. (실행시 아래 test를 계속 해줘야 합니다)
$ git clone http://github.com/tensorflow/models
$ cd models/research

$ protoc object_detection/protos/*.proto --python_out=.
그 다음 환경변수를 설정해줍니다.
$ export PYTHONPATH=$PYTHONPATH:`pwd`:`pwd`/slim설치가 제대로 되었는지 확인합니다.
$ python object_detection/builders/model_builder_test.py설치가 모두 완료되었으면 MSCOCO dataset 을 이용해서 object detection 을 run 시켜봐야겠죠?
$ CUDA_VISIBLE_DEVICES=0 python object_detection_run.pypycocotools installation
다음은 pycocotools 를 설치해야 합니다. cocoapi를 local에 clone한 다음 setup 이동경로로 가서 pycocotools library를 설치하기만 하면 됩니다.
$ git clone https://github.com/philferriere/cocoapi.git

$ python setup.py install
training with customized dataset
이제 대망의 fine-tuning 을 할 차례입니다! fine-tuning을 하기 위해서는 자체적으로 가지고 있는 handbag 사진을 tensorflow에서 인식할 수 있도록 변환해주는 작업이 필요하겠죠?
$ python generate_tfrecord.py --csv_input=data/training_bag_csv --output_path=data/train.record --image_dir=images/
$ python generate_tfrecord.py --csv_input=data/test_bag_csv --output_path=data/test.record --image_dir=images/
그 다음 본인의 task에 맞추어 network config를 변경합니다. 우리가 흔히 알고 있는 hyperparameter-tuning (ex: batch_size, learning rate …) 의 과정이 바로 이 과정입니다!
그 다음 우리는 아무래도 handbag detection 에만 집중할 예정이니까 object-detection.pbtxt file 도 변경하는 것이 좋겠죠?
item {
  id: 1
  name: 'handbag'
}
마지막으로 model_main.py 를 실행시켜 training 을 합니다.
$ python model_main.py --pipeline_config_path=training/pipeline.config --model_dir=training/ \
    --num_train_steps=${NUM_TRAIN_STEPS} --sample_1_of_n_eval_examples=$SAMPLE_1_OF_N_EVAL_EXAMPLES \
    --alsologtostderr
Data Structure
전체 data structure는 다음과 같습니다.
  Project
  |--- data
  |    |--- test_bag_csv
  |    |--- training_bag_csv
  |    |--- train.record
  |    |--- test.record
  |--- images (for training/evaluation)
       |--- image1.jpg
       |--- image2.jpg
       |---
       ...
  |--- test_images
       |--- test_image1.jpg
       |--- test_image2.jpg
       |---
       ...
  |
  |--- my_network_output
       |--- saved_model
       |--- pipeline.config
       |--- frozen_inference_graph.pb
       |--- model.ckpt
       |--- checkpoint
  |--- label_map
       |--- mscoco_label_map.pbtxt (for minimal working)
  |--- test_result
       |--- my_network_for_customized
       |--- faster_rcnn_resnet101 (for minimal working)
       |--- ssd_mobilenet_v1 (for minimal working)
       ...
  |--- utils (for import label_map_util)
  |--- training
       |
       |--- model.ckpt
       |--- object-detection.pbtxt
       |--- pipeline.config
  |--- generate_tfrecord.py
  |--- export_inference_graph.py
  |--- model_main.py
  |--- object_detection_run.py (for test)
  |--- split_labels.ipynb
Test Result
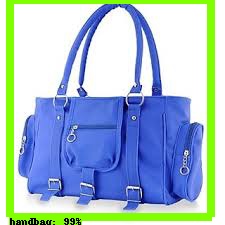
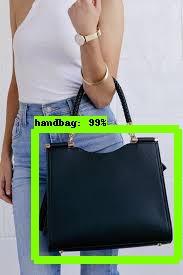
이제 최종 결과를 보도록 하겠습니다. 먼저 어떤 모델이 가장 적합할지 파악하기 위해서 faster-rcnn-resnet faster-rcnn-inception ssd-inception ssd-mobilenet 총 4개의 모델을 사용해서 성능을 비교했고 최종적으로 ssd_mobilenet_v1이 가장 가볍고 적합하다고 판단해서 그 모델을 base로 삼고 fine-tuning 을 진행했습니다. 처음에는 가방 자체를 찾는 것에 집중했고 결과는 아래와 같습니다.

그 다음 아무래도 가방이라고 정확하게 찾게 하기 위해서 handle을 포함하지 않는 dataset이 필요했기에 해당 task에 맞춰 dataset을 다시 준비했고 실험을 진행했습니다. 여기서는 추가로 tensorboard를 이용해 loss의 현황과 잘 수행하고 있는지 판단했습니다, 그 결과는 아래와 같습니다.
# tensorboard 로 현재 학습되고 있는 images와 loss를 확인할 수 있다.
$ tensorboard --logdir='training'
# inference graph를 뽑아 test를 위한 준비를 한다.
$ python export_inference_graph.py --input_type=image_tensor --pipeline_config_path=pipeline.config \
--trained_checkpoint_prefix=training/model.ckpt-** --output_directory=output/
$ CUDA_VISIBLE_DEVICES=0 python object_detection_run.py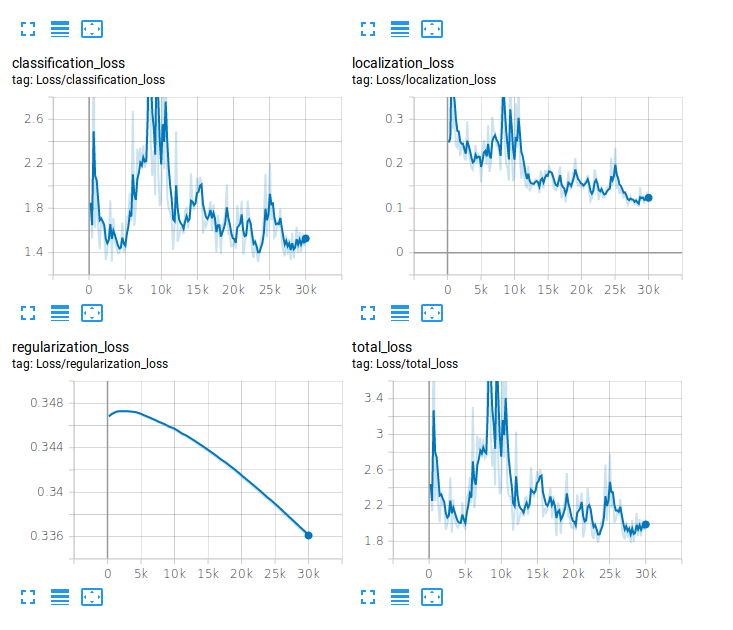
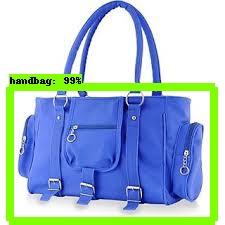

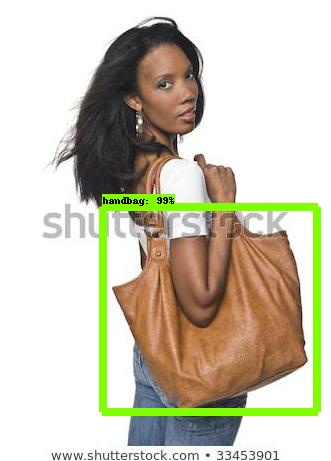
위 사진에 보이는 것처럼 사람이 들고 있지 않는 가방에 대해서는 잘 찾았으나 사람이 들고 있는 사진에 대한 dataset는 없었기 때문에 사람이 들고 있는 사진에 대한 labeling 이 필요했습니다. 결국 그 dataset까지 추가시켜 마지막 실험을 진행했습니다. 그 결과는 아래와 같습니다.
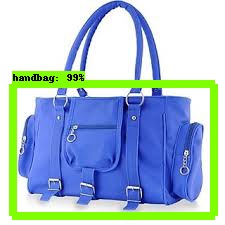
다 끝났다고 생각했는데… 한 가지 간과한 것이 있었습니다. 바로 여러 개의 가방에 대한 multi-labeling 을 진행하지 않았기 때문에 여러 가방이 나오는 것은 잘 찾지 못하는 결과가 있었습니다.
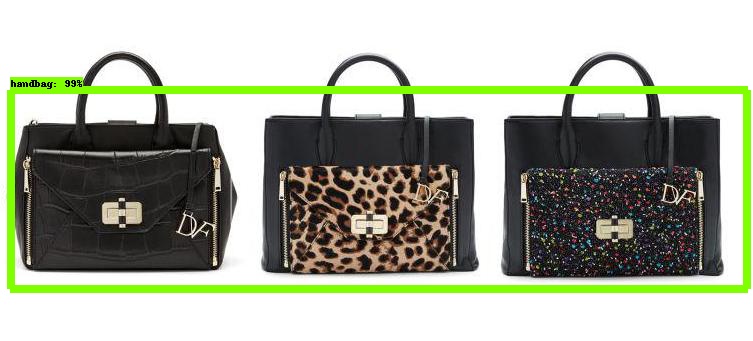 여러 가방에 대한 multi-labeling 이 필요했지만 저희가 이
 여성 가방 서비스 Monde 를 개발하는 중간에 중고거래와 관련된 사업으로 피벗을 진행하게 되면서 이 고도화에 관한 부분을 생각하지 않게 되었습니다.
이렇게 monde 의 두 가지 main 기술 중 하나인 object-detection 에 대한 실험 순서와 그 결과를 공유했는데요. 점점 이 분야는 더욱 간단해지고 쉽게 접근할 수 있는 만큼 이제는 toy-example 의 느낌으로 읽는 개발자분들이 많을 것입니다. 제 경험상 제일 이 분야를 이해하기 쉬운 방법은 아무래도 자신만의 task를 정하고 그걸 수행하면서 실력을 키워나가는 것이라고 생각합니다. 저도 실제로 이걸 하면서 object detection 분야를 좀 더 이해하게 된 계기가 되었습니다. 하나의 모델을 활용하는데에 있어서 이 모델은 어떤 방식으로 접근하고 어떤 점이 더 나은지 paper를 보면서 돌려보니 훨씬 더 이해도 빠르고 재밌더라고요 여러분들도 AI 개발자가 되고 싶다면 developer 의 마인드도 중요하지만 researcher 의 마인드를 가져야 한다는 걸 잊지 마세요 그럼 다음 포스트에서 봐요! 🖐